
Android Firebase Realtime Database CRUD Tutorial

Google have announce new Firebase Real-time Database for multiple platform such as Android, IOS and Websites. It is a cloud based hosted database that stored in JSON format and real time synchronize the latest update from the server. Firebase Real-time Database does not need to write server code such as PHP to retrieve the data from the server, its can just retrieve from client application. It is the best choice for developer who dint have server side knowledge or require limited time to develop an application. In this tutorial, I will teach you how to use android firebase realtime database in your mobile application.
Creating a New Project
1. Open Android Studio IDE in your computer.
2. Create a new project and Edit the Application name to “FirebaseDatabaseExample”.
(Optional) You can edit the company domain or select the suitable location for current project tutorial. Then click next button to proceed.
3. Select Minimum SDK (API 15:Android 4.0.3 (IceCreamSandwich). I choose the API 15 because many android devices currently are support more than API 15. Click Next button.
4. Choose “Empty Activity” and Click Next button
5. Lastly, press finish button.
Add project in Firebase Console
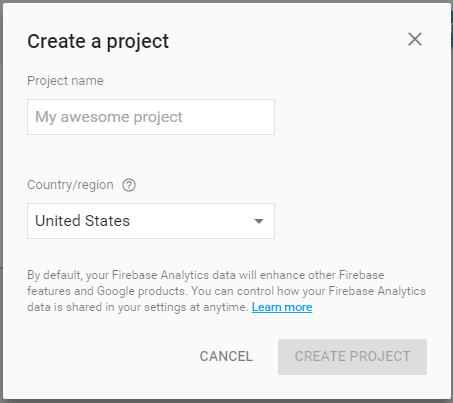
Go to Firebase console https://console.firebase.google.com/ and create a new project. Enter your project name and select which country you live.
Add firebase to Android App
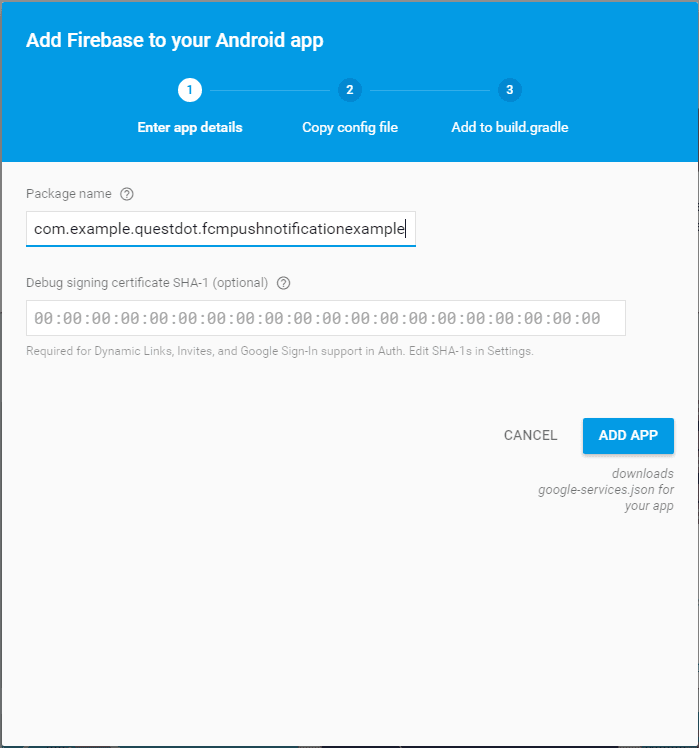
Inside the project control panel select add firebase to android app. Enter your android project and copy the package name into the firebase console package name section. After that click Add app button.
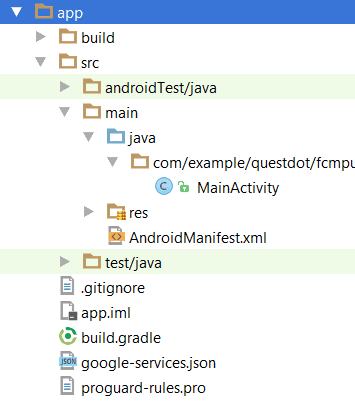
Move google-services.json into your project
It will automaticaly download a json file into your computer. Then switch to the Project view in Android Studio to see your project root directory and move the it into your Android app module root directory.
Edit build.gradle
In the project-level build.gradle add the following line.
buildscript {
  dependencies {
    // Add this line
    classpath 'com.google.gms:google-services:3.0.0'
  }
}
After that go to your app-level build.gradle, apply the plugin and add a new dependency
This show insert below the dependency if not it will occur error.
dependencies{
  compile 'com.google.firebase:firebase-database:9.8.0'
}

apply plugin: 'com.google.gms.google-services'
Now, you can synchronize your android project.
Create Custom Alert layout
Open res folder and Right click layout to create a new xml file “custom_alert.xml” for custom alert. After that, change the xml source code to the sample below.
<?xml version="1.0" encoding="utf-8"?>
<LinearLayout xmlns:android="http://schemas.android.com/apk/res/android"
    android:layout_width="match_parent"
    android:layout_height="match_parent"
    android:orientation="vertical">

    <ScrollView
        android:layout_width="match_parent"
        android:layout_height="match_parent">

        <LinearLayout
            android:layout_width="match_parent"
            android:layout_height="match_parent"
            android:orientation="vertical">

            <EditText
                android:id="@+id/updtname"
                android:layout_width="match_parent"
                android:layout_height="wrap_content" />

            <EditText
                android:id="@+id/updtage"
                android:layout_width="match_parent"
                android:layout_height="wrap_content" />

            <Button
                android:id="@+id/update"
                android:layout_width="match_parent"
                android:layout_height="wrap_content"
                android:gravity="center"
                android:text="Update"
              />

            <Button
                android:id="@+id/delete"
                android:layout_width="match_parent"
                android:layout_height="wrap_content"
                android:gravity="center"
                android:text="Delete"
                />

        </LinearLayout>

    </ScrollView>
</LinearLayout>
Create a custom list item layout
Create another xml again in your layout folder and name it “custom_list.xml”. Then, modify the xml to the sample below.
<?xml version="1.0" encoding="utf-8"?>
<LinearLayout xmlns:android="http://schemas.android.com/apk/res/android"
    android:orientation="vertical" android:layout_width="match_parent"
    android:layout_height="match_parent">

    <TextView
        android:text="Name: "
        android:id="@+id/readname"

        android:layout_gravity="center"
        android:padding="5dp"
        android:layout_width="match_parent"
        android:layout_height="wrap_content"
        android:textSize="25sp"/>
    <TextView
        android:text="Age: "
        android:id="@+id/readage"
        android:padding="5dp"
        android:layout_width="match_parent"
        android:layout_height="wrap_content"
        android:textSize="25sp"/>

</LinearLayout>
Edit activity_main.xml layout
Copy and paste the source code below in your activity_main.xml.
<?xml version="1.0" encoding="utf-8"?>
<LinearLayout xmlns:android="http://schemas.android.com/apk/res/android"
    xmlns:tools="http://schemas.android.com/tools"
    android:layout_width="match_parent"
    android:layout_height="match_parent"
    android:paddingBottom="@dimen/activity_vertical_margin"
    android:paddingLeft="@dimen/activity_horizontal_margin"
    android:paddingRight="@dimen/activity_horizontal_margin"
    android:paddingTop="@dimen/activity_vertical_margin"
    android:orientation="vertical"
    >

    <LinearLayout
        android:layout_width="match_parent"
        android:layout_height="match_parent"
        android:orientation="vertical">

        <EditText
            android:id="@+id/writename"
            android:layout_width="match_parent"
            android:layout_height="wrap_content"
            android:layout_margin="8dp"
            android:gravity="center"
            android:hint="Enter Name"
           />

        <EditText
            android:id="@+id/writeage"
            android:layout_width="match_parent"
            android:layout_height="wrap_content"
            android:layout_margin="8dp"
            android:gravity="center"
            android:hint="Enter Age"
            android:inputType="number"
           />

        <Button
            android:id="@+id/submit"
            android:layout_width="match_parent"
            android:layout_height="wrap_content"
            android:layout_margin="8dp"
            android:text="Add"

            android:textStyle="bold" />

        <LinearLayout
            android:layout_width="match_parent"
            android:layout_height="wrap_content">

            <EditText
                android:layout_width="0dp"
                android:layout_height="wrap_content"
                android:textSize="20sp"
                android:layout_weight="2"
                android:id="@+id/search"/>
            <Button
                android:layout_width="0dp"
                android:layout_height="wrap_content"
                android:textSize="20sp"
                android:layout_weight="1"
                android:text="Search"
                android:id="@+id/btn_search"/>
        </LinearLayout>

            <ListView

                android:layout_width="match_parent"
                android:layout_height="match_parent"
                android:id="@+id/readlist">


            </ListView>


    </LinearLayout>


</LinearLayout>
Create a new model class
Right click the package name and create the new class “Data” to add 3 fields key, name and age.
public class Data {

    String key;

    String name;
    int age;

    public Data(String key, String name, int age) {
        this.key = key;
        this.name = name;

        this.age = age;
    }

    public Data() {
    }


    public String getKey() {
        return key;
    }

    public String getName() {
        return name;
    }


    public int getAge() {
        return age;
    }
}
Create a Adapter class
Right click the package name again and follow the sample below to declare a custom adapter for your list.
public class CustomAdapter extends BaseAdapter {

    TextView name, age;

    Context context;

    ArrayList<Data> data;

    LayoutInflater inflater;

    public CustomAdapter(Context context, ArrayList<Data> data) {
        this.context = context;
        this.data = data;
    }

    @Override
    public int getCount() {
        return data.size();
    }

    @Override
    public Object getItem(int i) {
        return null;
    }

    @Override
    public long getItemId(int i) {
        return 0;
    }

    @Override
    public View getView(int i, View view, ViewGroup viewGroup) {

        view = inflater.from(context).inflate(R.layout.custom_list,viewGroup,false);

        name = (TextView) view.findViewById(R.id.readname);
        age = (TextView) view.findViewById(R.id.readage);


        name.setText(name.getText()+data.get(i).getName());
        age.setText(age.getText()+""+ data.get(i).getAge());


        return view;
    }
}
Edit MainActivity.java class
Go to MainActivity class and this class will be perform Create, Retrieve, Update and Delete Operation for the firebase realtime database. Besides, it also allow to search with specific name.
import com.google.firebase.database.ChildEventListener;
import com.google.firebase.database.DataSnapshot;
import com.google.firebase.database.DatabaseError;
import com.google.firebase.database.DatabaseReference;
import com.google.firebase.database.FirebaseDatabase;
import com.google.firebase.database.ValueEventListener;

import java.util.ArrayList;

public class MainActivity extends Activity {

    LayoutInflater inflater1;

    int count =0;
    int age;
    String name;

    EditText txtname, txtage,txtsearch;

    FirebaseDatabase firebaseDatabase;

    DatabaseReference databaseReference;

    Data data;


    ListView listView;

    ArrayList<Data> dataArrayList;

    CustomAdapter customAdapter;

    String key;

    int temp;

    @Override
    protected void onCreate(Bundle savedInstanceState) {
        super.onCreate(savedInstanceState);
        setContentView(R.layout.activity_main);


        firebaseDatabase = FirebaseDatabase.getInstance();

        databaseReference = firebaseDatabase.getReference().child("Students");
        key=databaseReference.push().getKey();

        txtname = (EditText) findViewById(R.id.writename);
        txtage = (EditText)findViewById(R.id.writeage);
        listView = (ListView) findViewById(R.id.readlist);

          findViewById(R.id.submit).setOnClickListener(new View.OnClickListener() {
                @Override
                public void onClick(View view) {


                    try {

                        name = txtname.getText().toString().trim();


                        if (TextUtils.isEmpty(name) ) {

                            Toast.makeText(getApplicationContext(), "Please Enter Name", Toast.LENGTH_SHORT).show();

                        } else {

                            age = Integer.parseInt(txtage.getText().toString().trim());

                            data = new Data(databaseReference.push().getKey(), name, age);

                            databaseReference.child(data.getKey()).setValue(data);

                            Toast.makeText(getApplicationContext(), "Submitted", Toast.LENGTH_SHORT).show();

                            txtname.setText("");
                            txtage.setText("");

                        }
                    } catch (Exception e) {

                        Toast.makeText(getApplicationContext(), "" + e, Toast.LENGTH_SHORT).show();

                    }


                }
        });

        dataArrayList = new ArrayList<>();

        customAdapter = new CustomAdapter(MainActivity.this, dataArrayList);

        listView.setAdapter(customAdapter);


        databaseReference.addChildEventListener(new ChildEventListener() {
            @Override
            public void onChildAdded(DataSnapshot dataSnapshot, String s) {

                Data datam = dataSnapshot.getValue(Data.class);

                dataArrayList.add(datam);

                customAdapter.notifyDataSetChanged();
            }

            @Override
            public void onChildChanged(DataSnapshot dataSnapshot, String s) {

            }

            @Override
            public void onChildRemoved(DataSnapshot dataSnapshot) {

            }

            @Override
            public void onChildMoved(DataSnapshot dataSnapshot, String s) {

            }

            @Override
            public void onCancelled(DatabaseError databaseError) {

            }
        });


        listView.setOnItemClickListener(new AdapterView.OnItemClickListener() {
            @Override
            public void onItemClick(AdapterView<?> adapterView, View view, int i, long l) {


                final View v = inflater1.from(getApplicationContext()).inflate(R.layout.custom_alert, null);
                temp = i;

                final EditText updtname, updtage;

                updtname = (EditText) v.findViewById(R.id.updtname);
                updtage = (EditText) v.findViewById(R.id.updtage);


                final AlertDialog.Builder builder  = new AlertDialog.Builder(MainActivity.this).setView(v);
                final AlertDialog alert = builder.create();

                v.findViewById(R.id.update).setOnClickListener(new View.OnClickListener() {
                    @Override
                    public void onClick(View view) {

                        Data tempData = new Data(dataArrayList.get(temp).getKey(), updtname.getText().toString().trim(),
                                Integer.parseInt(updtage.getText().toString().trim()));

                        databaseReference.child(dataArrayList.get(temp).getKey()).setValue(tempData);

                        dataArrayList.remove(temp);

                        dataArrayList.add(temp,tempData);

                        customAdapter.notifyDataSetChanged();
                    }
                });

                v.findViewById(R.id.delete).setOnClickListener(new View.OnClickListener() {
                    @Override
                    public void onClick(View view) {
                        if(temp == -1){

                            Toast.makeText(getApplicationContext(), "There is no data to delete", Toast.LENGTH_SHORT).show();

                        }else {

                            databaseReference.child(dataArrayList.get(temp).getKey()).removeValue();

                            dataArrayList.remove(temp);

                            customAdapter.notifyDataSetChanged();

                           alert.cancel();

                            temp = -1;
                        }
                    }
                });


                updtname.setText(dataArrayList.get(temp).getName());

                updtage.setText("" + dataArrayList.get(temp).getAge());


                try {


                    alert.show();

                } catch (Exception e) {

                    Log.d("show", "onItemClick: " + e);

                }


                return;


            }
        });

        txtsearch = (EditText) findViewById(R.id.search);

        findViewById(R.id.btn_search).setOnClickListener(new View.OnClickListener() {
            @Override
            public void onClick(View view) {

                name = txtsearch.getText().toString().trim();

                databaseReference.orderByChild("name").equalTo(name).addListenerForSingleValueEvent(new ValueEventListener() {
                    @Override
                    public void onDataChange(DataSnapshot dataSnapshot) {

                        ++count;


                        for (DataSnapshot dataSnapshot1 : dataSnapshot.getChildren()){

                            data = dataSnapshot1.getValue(Data.class);
                            dataArrayList.clear();
                            dataArrayList.add(data);
                            Log.d("log", "onDataChange: "+dataSnapshot1.child("name").getValue());

                        }


                        func();


                    }

                    @Override
                    public void onCancelled(DatabaseError databaseError) {

                    }
                });


            }
        });

        realtimeUpdate();
    }

    public void realtimeUpdate(){
        databaseReference.addValueEventListener(new ValueEventListener() {
            @Override
            public void onDataChange(DataSnapshot dataSnapshot) {
                dataArrayList.clear();
                for (DataSnapshot dataSnapshot1 : dataSnapshot.getChildren()){

                    data = dataSnapshot1.getValue(Data.class);

                    dataArrayList.add(data);

                }


               customAdapter.notifyDataSetChanged();


            }

        @Override
        public void onCancelled(DatabaseError databaseError) {

        }
    });
}

    public void func(){

        if(count!=0){

            customAdapter = new CustomAdapter(getApplicationContext(),dataArrayList);

            listView.setAdapter(customAdapter);

        }else {

            Toast.makeText(getApplicationContext(), "There is no data to show", Toast.LENGTH_SHORT).show();
            listView.setVisibility(View.GONE);
        }


    }
}
Run Your Project
At last, now you can run your project in your android device, you can try to delete database record from the firebase console and you will see the real-time instant changes on your devices.
View your Database
Go to your firebase console, you will see “Database” in the left section list. Click it to check your database, it is work anot.
Note : you should change the rules to the following because this sample project we dont use authentication. So we should allow it to access the database to the public.
{
"rules": {
".read": true,
".write": true
}
}


you must add the screenshots of the activities in each tutorial
Hello KRISTOFER NG , i made an app by your tutorial and its working great by searching and adding users, BUT i have a problem – whole update and delete part does not work properly, it’s just stopping whole app and exit to starting page of emulator…
Could you answer me for some support in this problem,please?
Sincerely, Bloo
Hi, Nice article. It helped me to build my first android app connecting with Firebase. But `dimens.xml` file is missing.