Android WebView Bind Javascript Tutorial

Javascript is very useful in web development, it is a very popular programming language should be learn from every developers. Many of us will ask does javascipt able to bind with the android webview. Good news for us, you can create the interface in the javascript and get the interface to perform some action in the android application. For example, you can create a button in the html, add a interface to the button event. Then you can use the html button to navigate another activity. In this tutorial, I will tell you how to use android webview bind javascript so you can use it in every project.
Creating a new Project
1. Open Android Studio IDE in your computer.
2. Create a new project and Edit the Application name to “JavaScriptWebViewExample”.
(Optional) You can edit the company domain or select the suitable location for current project tutorial. Then click next button to proceed.
3. Select Minimum SDK (API 15:Android 4.0.3 (IceCreamSandwich). I choose the API 15 because many android devices currently are support more than API 15. Click Next button.
4. Choose “Empty Project” and Click Next button
5. Lastly, press finish button.
Add a new assets folder
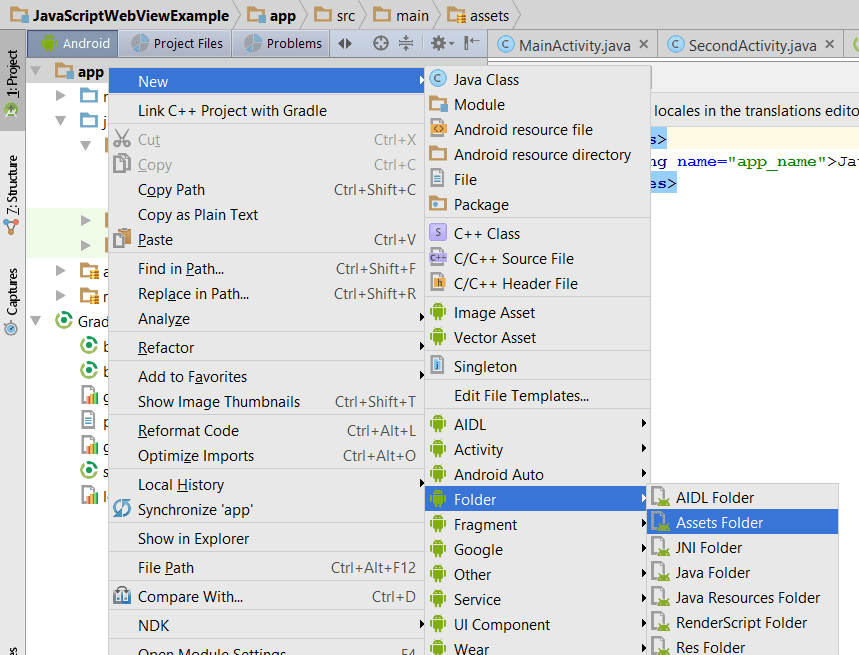
By create a new assets folder, right click “app” module > new > Folder > assets folder, then it will create an assets folder for you. The below picture is the sample steps to create assets folder.
Create a html file
After that, create a html file by right click the assets folder > new > file. Name the html file as “sample.html”. Then follow the source code below to add buttons in the html file and create the javascript interface.
<html>
<head>
    <style>
body{

}
input{

width: 300px;
padding:10px;

}
div#content{
padding:20px;

}
</style>
    <script type="text/javascript">
    function showToastA(toastmsg) {
        InterfaceName.showToast(toastmsg);
    }
 function navigateToAnotherActivityA() {
        InterfaceName.navigateToAnotherActivity();
    }
</script>
</head>
<body>
<center>
    <h3>Javascript bind to Android</h3>

    <div>
        <input type="button" value="Show Toast" onClick="showToastA('Message from Javascript')" /><br/><br/>
        <input type="button" value="Go to Another Activity" onClick="navigateToAnotherActivityA()" />
    </div>
</center>
</body>
</html>
Create a Second Activity
After create the html file, go to create a new activity in your project, so later you will use the html button navigate to this activity.
Edit activity_main.xml layout
Besides, view your activity_main.xml and add a webview inside the relative layout like the source code below.
<?xml version="1.0" encoding="utf-8"?>
<RelativeLayout xmlns:android="http://schemas.android.com/apk/res/android"
    xmlns:tools="http://schemas.android.com/tools"
    android:id="@+id/activity_main"
    android:layout_width="match_parent"
    android:layout_height="match_parent"
    android:paddingBottom="@dimen/activity_vertical_margin"
    android:paddingLeft="@dimen/activity_horizontal_margin"
    android:paddingRight="@dimen/activity_horizontal_margin"
    android:paddingTop="@dimen/activity_vertical_margin"
    tools:context="com.questdot.javascriptwebviewexample.MainActivity">

    <WebView
        xmlns:android="http://schemas.android.com/apk/res/android"
        android:id="@+id/webkit"
        android:layout_width="fill_parent"
        android:layout_height="fill_parent" />
</RelativeLayout>
Edit MainActivity.java class
Open your mainactivity class and edit to the source code below. The second parameter “InterfaceName” in the addJavascriptInterface should be same as the html file else you will get error.
public class MainActivity extends AppCompatActivity {

    @Override
    protected void onCreate(Bundle savedInstanceState) {
        super.onCreate(savedInstanceState);
        setContentView(R.layout.activity_main);

        WebView browser;
        browser=(WebView)findViewById(R.id.webkit);

        browser.getSettings().setJavaScriptEnabled(true);

        browser.addJavascriptInterface(new WebAppInterface(this), "InterfaceName");

        browser.loadUrl("file:///android_asset/sample.html");
    }

    public class WebAppInterface {
        Context mContext;

        WebAppInterface(Context c) {
            mContext = c;
        }

        @JavascriptInterface
        public void showToast(String toast) {
            Toast.makeText(mContext, toast, Toast.LENGTH_SHORT).show();
        }


        @JavascriptInterface
        public void navigateToAnotherActivity(){
            AlertDialog.Builder alertDialog = new AlertDialog.Builder(mContext);

            alertDialog.setTitle("Alert Message");

            alertDialog.setMessage("You want to Go another Activity?");

            alertDialog.setPositiveButton("YES",
                    new DialogInterface.OnClickListener() {
                        public void onClick(DialogInterface dialog, int which) {

                            Intent chnIntent = new Intent(MainActivity.this, SecondActivity.class);
                            startActivity(chnIntent);
                        }
                    });

            alertDialog.setNegativeButton("NO",
                    new DialogInterface.OnClickListener() {
                        public void onClick(DialogInterface dialog, int which) {

                            dialog.cancel();
                        }
                    });
            // Showing Alert Message
            alertDialog.show();
        }
    }
}
Run you Project
In conclusion, the webview is successfully bind with the javascript and now you can perform some action in your android project so you can see the effect.


