Android PHP MySQL Login Tutorial

Android has many options to choose which database you want to use in the applications. SQLite database only good for data that store in the local device, it is not possible to use it globally. To share and use one database everywhere then we should web server to achieve it which Android PHP MySQL is a good choice. Moreover, android application is able to connect PHP to use and do some modification in MySQL database. Mysql is an open source relational database management system (RDMS), it is widely used over the world. In this tutorial, you will learn how to connect MySQL in the android application and do a simple login to test out the result.
Pre-requisites
- Android Studio
- Apache Web Server and MySQL (Recommend to download XAMPP)
First, you need to open XAMPP and start Apache and MySQL.
Create a Login table
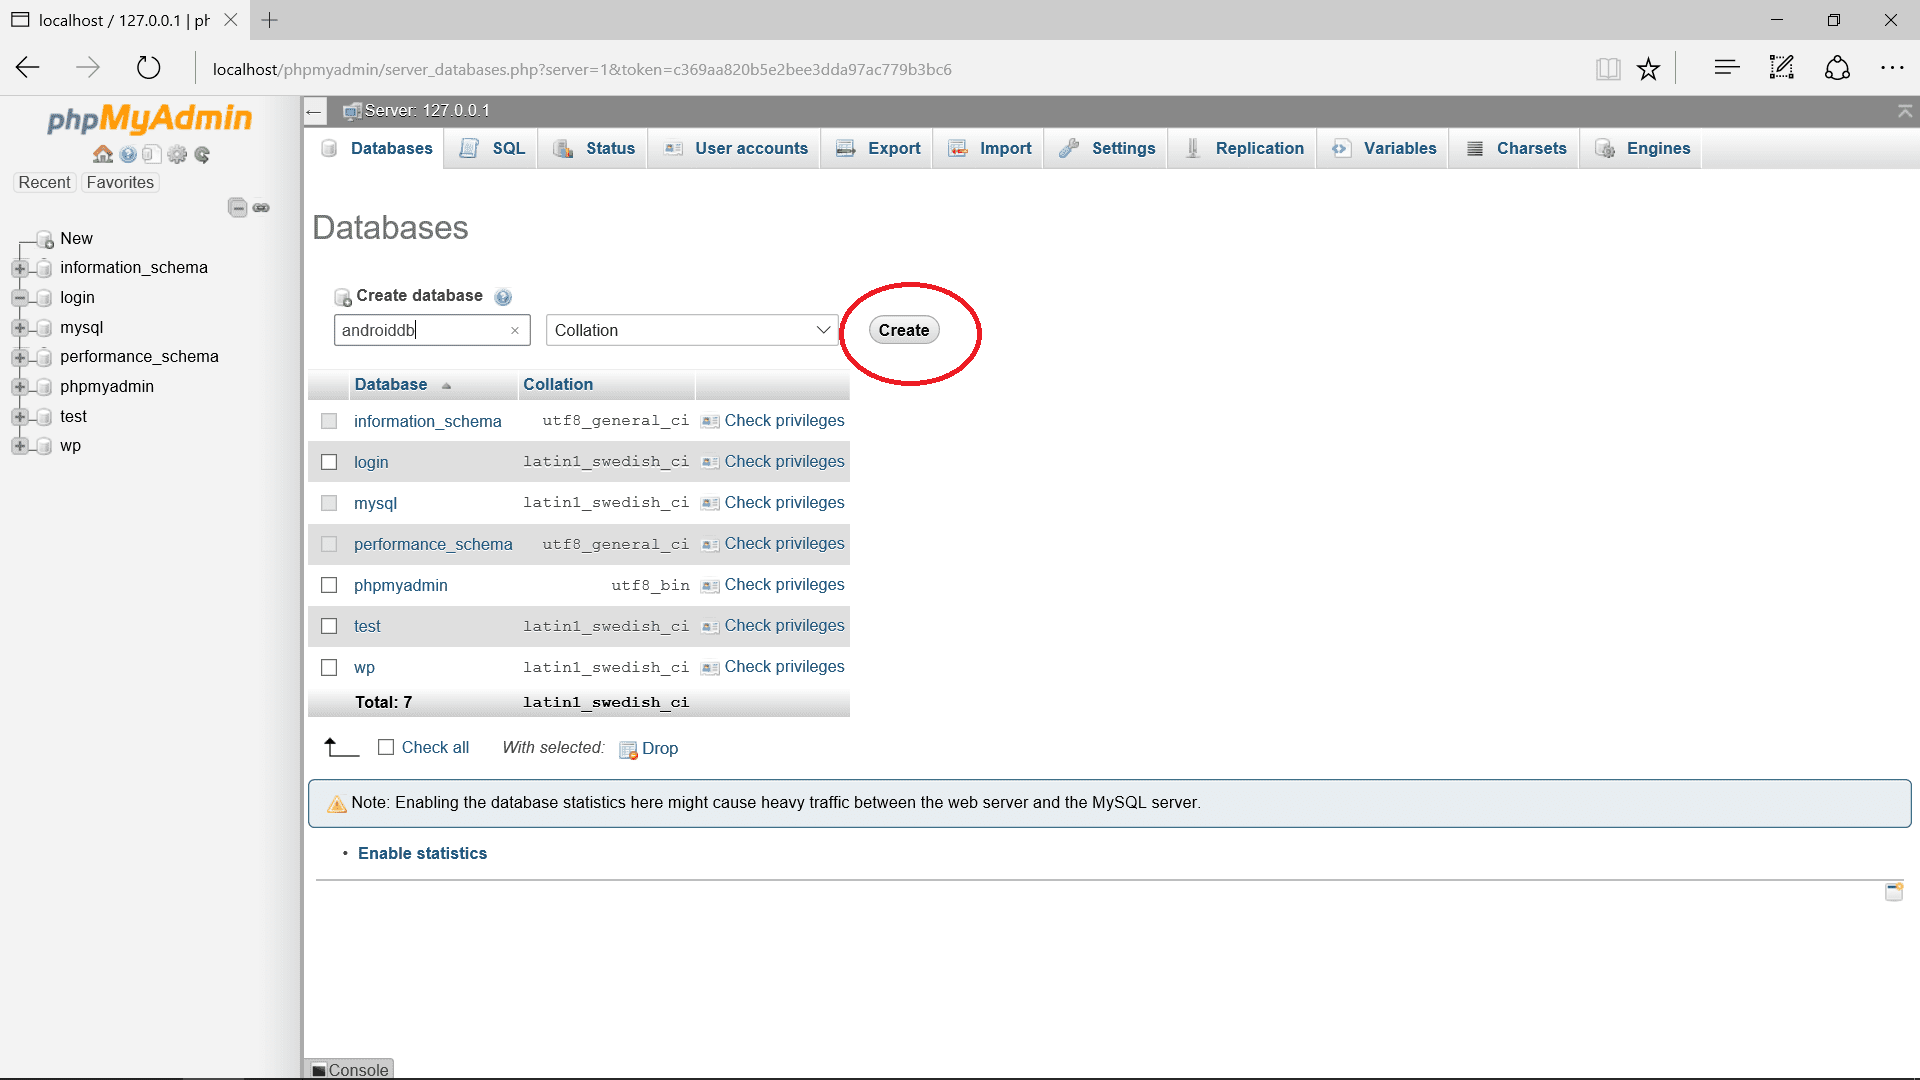
Go to PHPMyAdmin in your localhost, eg (//localhost/phpmyadmin/). Add a new database table name it as “androiddb“.
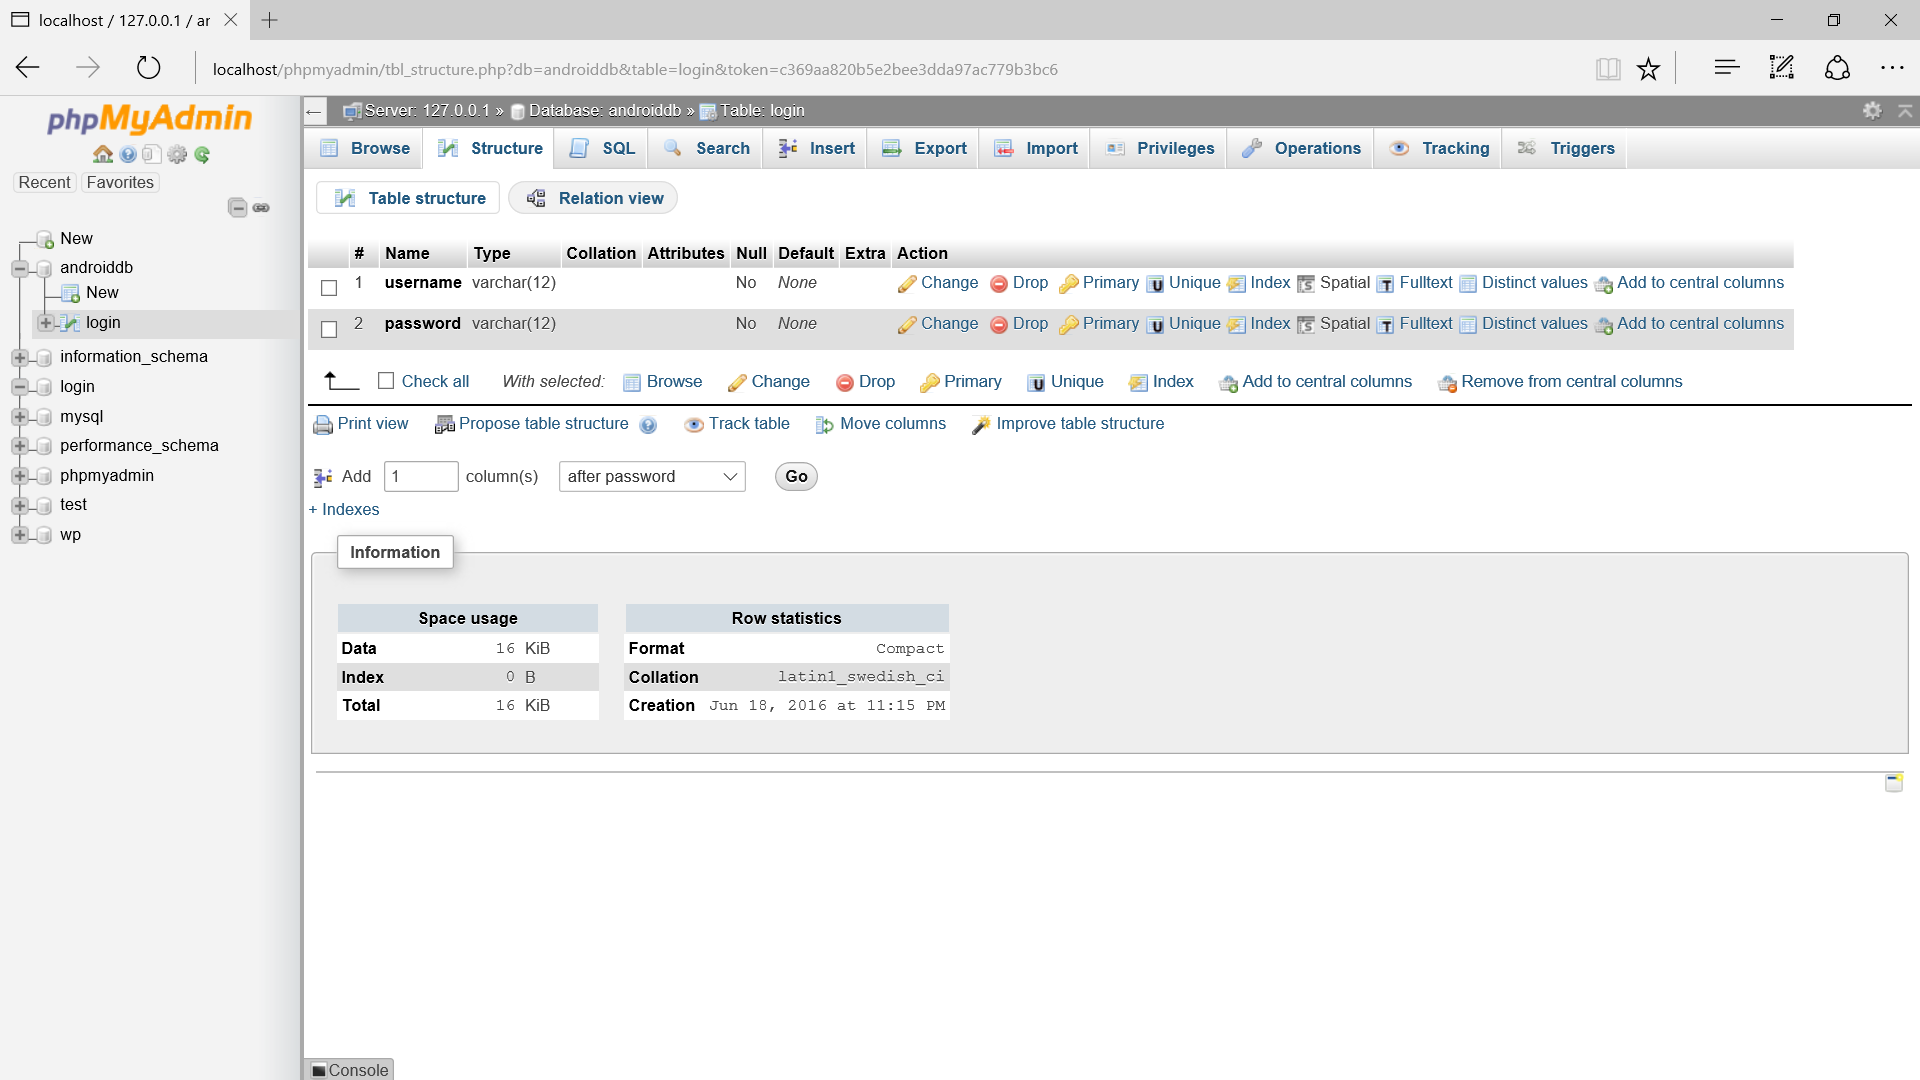
After that, add a new “login” table. The login table has two rows which are username and password. Follow the following field detail to create it.
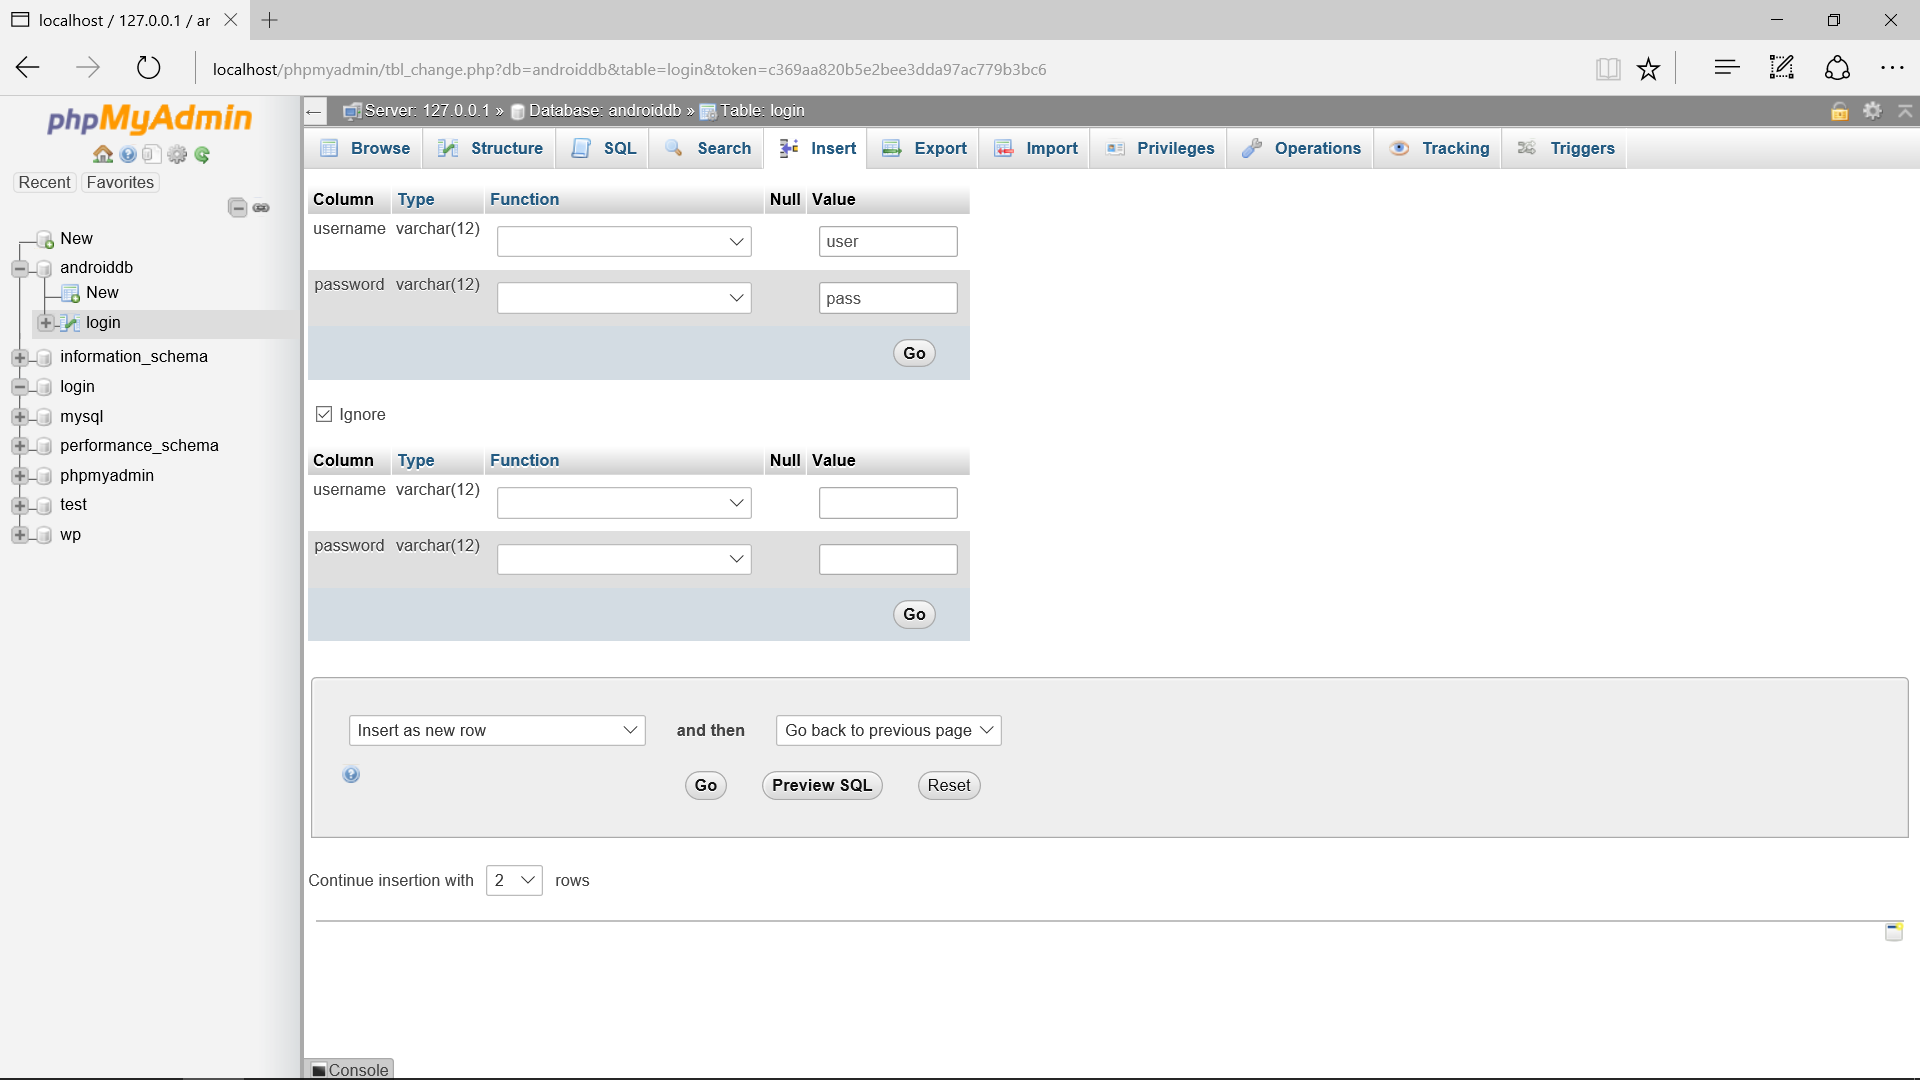
Insert a record, I set the username is “user” and password is “pass” so that later can test with this username in the mobile application.
Create a New PHP Project
Add a new project name “php-android-login” and add two new PHP file. The first is config.php and second is login.php.
Edit config.php file
This file is to connect to the MySQL database, you should enter your server name. In my situation, I use localhost so I enter localhost. Enter the server username and password, my password empty cause I dint set any password. Next, enter the database name “login” that created just now. All information should be correct so that you able to connect the server. You can test run the config.php to test whether connect a not, if not connected it will prompt “Cannot connect to db”.
<?php

$servername = "localhost";
$username = "root";
$password = "";
$dbname = "login";

try {
    	$conn = new PDO("mysql:host=$servername;dbname=$dbname", $username, $password);
    	$conn->setAttribute(PDO::ATTR_ERRMODE, PDO::ERRMODE_EXCEPTION);
    }
catch(PDOException $e)
    {
    	die("Cannot connect to db");
    }

?>
Edit login.php file
Copy below code into your login.php. In short, the code means if username and password match to your login table record, the result will become true. Else, will become false.
<?php

    include 'config.php';
    $result='';
     if(isset($_POST['username']) && isset($_POST['password']))
     {


            $username = $_POST['username'];
          $password = $_POST['password'];


          $sql = 'SELECT * FROM login WHERE  username = :username AND password = :password';
          $stmt = $conn->prepare($sql);
          $stmt->bindParam(':username', $username, PDO::PARAM_STR);
          $stmt->bindParam(':password', $password, PDO::PARAM_STR);
          $stmt->execute();
          if($stmt->rowCount())
          {
          $result="true";
          }
          elseif(!$stmt->rowCount())
          {
            $result="false";
          }

            echo $result;
   }

?>
Creating a New Android Project
1. Open Android Studio IDE in your computer.
2. Create a new project and Edit the Application name to “PhpMysqlExample”.
(Optional) You can edit the company domain or select the suitable location for current project tutorial. Then click next button to proceed.
3. Select Minimum SDK (API 15:Android 4.0.3 (IceCreamSandwich). I choose the API 15 because many android devices currently are support more than API 15. Click Next button.
4. Choose “Empty Activity” and Click Next button
5. Lastly, press finish button.
Edit activity_main.xml layout
I add two text view in this layout to determine this is the main page. You can copy the following code.
<?xml version="1.0" encoding="utf-8"?>
<RelativeLayout xmlns:android="//schemas.android.com/apk/res/android"
    xmlns:tools="//schemas.android.com/tools" android:layout_width="match_parent"
    android:layout_height="match_parent" android:paddingLeft="@dimen/activity_horizontal_margin"
    android:paddingRight="@dimen/activity_horizontal_margin"
    android:paddingTop="@dimen/activity_vertical_margin"
    android:paddingBottom="@dimen/activity_vertical_margin">


    <TextView
        android:layout_width="wrap_content"
        android:layout_height="wrap_content"
        android:textAppearance="?android:attr/textAppearanceMedium"
        android:text="Successfully Login"
        android:id="@+id/textView2"

        android:layout_centerVertical="true"
        android:layout_centerHorizontal="true" />

    <TextView
        android:layout_width="wrap_content"
        android:layout_height="wrap_content"
        android:text="Main Page"
        android:id="@+id/textView"
        android:layout_alignParentTop="true"
        android:layout_centerHorizontal="true" />

</RelativeLayout>
Create a Login Activity
Right click package name > New > Activity > EmptyActivity. After that, enter your activity name “LoginActivity”. Click finish button.
Edit activity_login.xml layout
The following code is activity_login.xml, I add two EditText for username and password input. Then, I add a button to do background process to enter main activity.
<?xml version="1.0" encoding="utf-8"?>
<RelativeLayout xmlns:android="//schemas.android.com/apk/res/android"
    xmlns:tools="//schemas.android.com/tools" android:layout_width="match_parent"
    android:layout_height="match_parent" android:paddingLeft="@dimen/activity_horizontal_margin"
    android:paddingRight="@dimen/activity_horizontal_margin"
    android:paddingTop="@dimen/activity_vertical_margin"
    android:paddingBottom="@dimen/activity_vertical_margin" tools:context=".MainActivity">

    <EditText
        android:layout_width="match_parent"
        android:layout_height="wrap_content"
        android:inputType="textEmailAddress"
        android:ems="10"
        android:id="@+id/username"
        android:hint="Username"
        android:layout_alignParentTop="true"
        android:layout_alignParentLeft="true"
        android:layout_alignParentStart="true" />

    <EditText
        android:layout_width="match_parent"
        android:layout_height="wrap_content"
        android:inputType="textPassword"
        android:ems="10"
        android:id="@+id/password"
        android:hint="Password"
        android:layout_below="@+id/username"
        android:layout_alignParentLeft="true"
        android:layout_alignParentStart="true" />

    <Button
        android:layout_width="match_parent"
        android:layout_height="wrap_content"
        android:text="LOGIN"
        android:id="@+id/btnlogin"
        android:layout_alignParentBottom="true"
        android:layout_alignParentLeft="true"
        android:layout_alignParentStart="true" />

</RelativeLayout>
Create a New class
Right click package name > New > Java class and name it as “AsyncLogin”.
Edit AsyncLogin.java class
The below source code is asynclogin.java. Asyntask is to perform background process, the url “//localhost/php-android-login/login.php” should be correct, otherwise, you cannot connect the application to the PHP file. The following URL is my local path, please check your local path correctly.
package com.example.questdot.phpmysqlexample;

import android.app.ProgressDialog;
import android.content.Intent;
import android.net.Uri;
import android.os.AsyncTask;
import android.widget.Toast;

import java.io.BufferedReader;
import java.io.BufferedWriter;
import java.io.IOException;
import java.io.InputStream;
import java.io.InputStreamReader;
import java.io.OutputStream;
import java.io.OutputStreamWriter;
import java.net.HttpURLConnection;
import java.net.MalformedURLException;
import java.net.URL;

/**
 * Created by HP on 19/6/2016.
 */
public class AsyncLogin extends AsyncTask<String, String, String> {
    private LoginActivity loginActivity;
    ProgressDialog pdLoading = new ProgressDialog(loginActivity);
    HttpURLConnection conn;
    URL url = null;

    public AsyncLogin(LoginActivity loginActivity) {
        this.loginActivity = loginActivity;
    }

    @Override
    protected void onPreExecute() {
        super.onPreExecute();

        //this method will be running on UI thread
        pdLoading.setMessage("\tLoading...");
        pdLoading.setCancelable(false);
        pdLoading.show();

    }

    @Override
    protected String doInBackground(String... params) {
        try {

            url = new URL("//localhost/php-android-login/login.php");

        } catch (MalformedURLException e) {
            // TODO Auto-generated catch block
            e.printStackTrace();
            return "exception";
        }
        try {
            // Setup HttpURLConnection class to send and receive data from php and mysql
            conn = (HttpURLConnection) url.openConnection();
            conn.setReadTimeout(15000);
            conn.setConnectTimeout(10000);
            conn.setRequestMethod("POST");

            // setDoInput and setDoOutput method depict handling of both send and receive
            conn.setDoInput(true);
            conn.setDoOutput(true);

            // Append parameters to URL
            Uri.Builder builder = new Uri.Builder()
                    .appendQueryParameter("username", params[0])
                    .appendQueryParameter("password", params[1]);
            String query = builder.build().getEncodedQuery();

            // Open connection for sending data
            OutputStream os = conn.getOutputStream();
            BufferedWriter writer = new BufferedWriter(
                    new OutputStreamWriter(os, "UTF-8"));
            writer.write(query);
            writer.flush();
            writer.close();
            os.close();
            conn.connect();

        } catch (IOException e1) {
            // TODO Auto-generated catch block
            e1.printStackTrace();
            return "exception";
        }

        try {

            int response_code = conn.getResponseCode();

            // Check if successful connection made
            if (response_code == HttpURLConnection.HTTP_OK) {

                // Read data sent from server
                InputStream input = conn.getInputStream();
                BufferedReader reader = new BufferedReader(new InputStreamReader(input));
                StringBuilder result = new StringBuilder();
                String line;

                while ((line = reader.readLine()) != null) {
                    result.append(line);
                }

                // Pass data to onPostExecute method
                return (result.toString());

            } else {

                return ("unsuccessful");
            }

        } catch (IOException e) {
            e.printStackTrace();
            return "exception";
        } finally {
            conn.disconnect();
        }


    }

    @Override
    protected void onPostExecute(String result) {

        //this method will be running on UI thread

        pdLoading.dismiss();

        if (result.equalsIgnoreCase("true")) {
            Intent intent = new Intent(loginActivity, MainActivity.class);
            loginActivity.startActivity(intent);
            loginActivity.finish();

        } else if (result.equalsIgnoreCase("false")) {

            // If username and password does not match display a error message
            Toast.makeText(loginActivity, "Invalid userename or password", Toast.LENGTH_LONG);

        } else if (result.equalsIgnoreCase("exception") || result.equalsIgnoreCase("unsuccessful")) {

            Toast.makeText(loginActivity, "OOPs! Something went wrong. Connection Problem.", Toast.LENGTH_LONG);

        }
    }

}
Edit LoginActivity.java class
The following code is loginactivity.java class copy and pastes it.
package com.example.questdot.phpmysqlexample;

import android.support.v7.app.AppCompatActivity;
import android.os.Bundle;
import android.view.View;
import android.widget.Button;
import android.widget.EditText;

public class LoginActivity extends AppCompatActivity {

    private EditText etUsername;
    private EditText etPassword;
    private Button btnLogin;

    @Override
    protected void onCreate(Bundle savedInstanceState) {
        super.onCreate(savedInstanceState);
        setContentView(R.layout.activity_login);


        etUsername = (EditText) findViewById(R.id.username);
        etPassword = (EditText) findViewById(R.id.password);
        btnLogin = (Button) findViewById(R.id.btnlogin);

        btnLogin.setOnClickListener(new View.OnClickListener() {
            @Override
            public void onClick(View v) {

                final String username = etUsername.getText().toString();
                final String password = etPassword.getText().toString();

                new AsyncLogin(LoginActivity.this).execute(username,password);

            }
        });

    }

}
Edit AndroidManifest.xml
You should add two permission which is INTERNET and ACCESS_NETWORK_STATE, else you will get the socket error. Besides, set LoginActivity to first launch.
<uses-permission android:name="android.permission.ACCESS_NETWORK_STATE" />
<uses-permission android:name="android.permission.INTERNET" />
Run Your Project
Now, you can run your project and test whether can log in to the main activity.
(Android PHP MySQL Login)
Source Code
Android
PHP


if i insert your code into my android studio the app on my phone opens, and i can enter a password and user name. but when i press the login button the app closess on my phone
same here.
may be issue is connecting to local host. im using windows 10. also i hv wamp server 3
did you download xampp to setup your web server?
same here.
may be issue is connecting to local host. im using windows 10. also i hv wamp server 3
you should connect it to your local ip address to fix the problem
hey hi,
I’m getting SocketTimeoutException: timeout. I’m running the app on nexus device.
But if I try to put the url in the browser open up to show connected.
Can you help ?
url = new URL(“http://localhost/php-android-login/login.php”);
for the url “localhost” change to your local ip address,
it should be work.
you can check your local ip address via command prompt by typing “ipconfig”
When I run the code, I get this null pointer in the logcat file :
java.lang.NullPointerException: Attempt to invoke virtual method ‘android.content.res.Resource&Theme android.content,Context.getTheme()’ c
How to rectify this?
send me your error screenshoot to admin@questdot.com
HI, that for the guide.
getting error as follow:
java.lang.NullPointerException: Attempt to invoke virtual method ‘android.content.res.Resources$Theme android.content.Context.getTheme()’ on a null object reference
at android.app.AlertDialog.resolveDialogTheme(AlertDialog.java:222)
at android.app.AlertDialog.(AlertDialog.java:200)
at android.app.AlertDialog.(AlertDialog.java:196)
at android.app.AlertDialog.(AlertDialog.java:141)
at android.app.ProgressDialog.(ProgressDialog.java:77)
crash upon clicking login button.
Using Wammp server. i able to connect through android phone with other project.
How to solve this?
url = new URL(“http://iplocal:8000/php-android-login/login.php”);
networkstate and internet permissions
private LoginActivity loginActivity;
private ProgressDialog pdLoading; ——-)))))))
private HttpURLConnection conn;
private URL url = null;
public AsyncLogin(LoginActivity loginActivity) {
this.loginActivity = loginActivity;
}
@Override
protected void onPreExecute() {
super.onPreExecute();
pdLoading = new ProgressDialog(loginActivity); —-))))))) here
//this method will be running on UI thread
pdLoading.setMessage(“\tLoading…”);
pdLoading.setCancelable(false);
pdLoading.show();
}
This fixed the error, cheers !
Hi
I created an APK file and installed on my phone. It goes directly to login successful without displaying the login page
Put the source code and we will download
you can get it from the bottom 🙂
where ActivityMain.java code?
Nothing to edit in the MainActivity.java class
i got problems with ProgressDialog it dosen’t work in
ProgressDialog pd = new ProgressDialog(loginActivity);
I have sendUserActionEvent() mView == null ………error
I have a query… I hd not followed your code bt approached in some other way and getting registration success toast but there is no data available in the database
If u r interested to help me out…. Then I should send u the screenshots
l
Hi, just want to comment a typo, you named your database as ‘androiddb’ at the beginning of the post but then you put ‘login’ as your database name in config.php
i got the message as application stopped working
Only about a week to ten days ago, we spent an hour and a half together talking about his dreams for Lebanon and for a peaceful Middle East.
I’ve been browsing online greater than three hours as of
late, but I never found any fascinating article like yours.
It’s beautiful value sufficient for me. In my view, if all web owners and bloggers made just right content material as
you probably did, the web will be a lot more useful than ever
before.
This was awesome
This helped alot thanks.
I have tried to grasp this concept from top devs but I couldn’t, all I get was errors am Happy your code worked pretty well, Good work,Keep up. Can you kindly do one on taking a photo and saving it locally to phone using sqlite database. Item, description and image (saved locally).
Thanks designed for sharing such a good opinion,
paragraph is nice, thats why i have read it entirely
How can I do the same if my config file is in godaddy hosting.