Android Preference Settings Tutorial

Mostly all mobile app have their own settings to let user control their application so it can provide more user experience to them. In android development, the preference settings is different with android activity which using approach to create them. Preference settings layout is create in the xml folder while android activity is create in the layout folder. They both using different xml code to create their own layout while both allow to customize what design they want to. In this tutorial, I will teach you how to create android preference settings and do some simple settings in the android application.
Creating a New Project
1. Open Android Studio IDE in your computer.
2. Create a new project and Edit the Application name to “SettingsExample”.
(Optional) You can edit the company domain or select the suitable location for current project tutorial. Then click next button to proceed.
3. Select Minimum SDK (API 15:Android 4.0.3 (IceCreamSandwich). I choose the API 15 because many android devices currently are support more than API 15. Click Next button.
4. Choose “Empty Activity” and Click Next button
5. Lastly, press finish button.
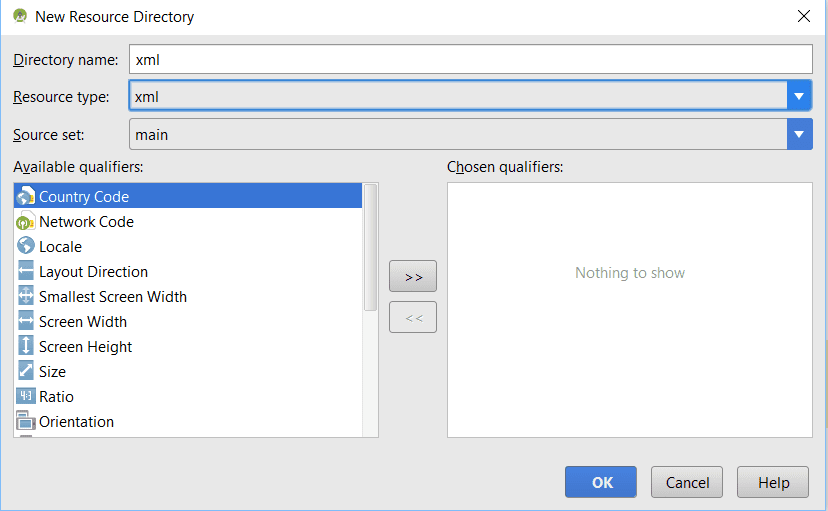
Create a XML folder
Go to your res folder > right click > new > new resource directory > resource type : xml and click ok.
Add a new xml file into xml folder
Right click xml folder and create one xml file “app_preferences” for the file name. After that edit it as the source code below. PreferenceCategory in the short term is section of preference.
<?xml version="1.0" encoding="utf-8"?>
<PreferenceScreen xmlns:android="http://schemas.android.com/apk/res/android">

    <PreferenceCategory
        android:title="General">

        <EditTextPreference
            android:title="Title"
            android:summary="This is title."
            android:key="title"
            android:defaultValue="Settings" />


    </PreferenceCategory>

    <PreferenceCategory
        android:title="Color">


        <CheckBoxPreference
            android:title="Background"
            android:summary="This is background."
            android:key="background"
            android:defaultValue="false"></CheckBoxPreference>

    </PreferenceCategory>


</PreferenceScreen>
Create a new empty activity
Right click your package name > new > activity > empty activity. Change the activity to “SettingsActivity” then click ok, it will auto create a activity and layout.
Edit activity_settings.xml layout
Go to the activity_settings.xml and edit to the source code below. I add the toolbar and framelayout for preferencefragment.
<?xml version="1.0" encoding="utf-8"?>
<RelativeLayout
    xmlns:android="http://schemas.android.com/apk/res/android"
    xmlns:app="http://schemas.android.com/apk/res-auto"
    android:orientation="vertical"
    android:layout_width="match_parent"
    android:layout_height="match_parent">

    <android.support.v7.widget.Toolbar
        android:id="@+id/toolbar"
        android:layout_height="wrap_content"
        android:layout_width="match_parent"
        android:minHeight="?attr/actionBarSize"
        android:background="?attr/colorPrimary"
        app:theme="@style/AppTheme"
        app:popupTheme="@style/ThemeOverlay.AppCompat.Light"/>

    <FrameLayout
        android:id="@+id/content_frame"
        android:layout_below="@+id/toolbar"
        android:layout_width="match_parent"
        android:layout_height="wrap_content" />

</RelativeLayout>
Edit SettingsActivity.java class
Go to this file and copy paste the source code that i provided in the below section. It will add settings fragment to the settings activity.
package com.questdot.settingsexample;


import android.app.FragmentManager;

import android.app.FragmentTransaction;
import android.preference.PreferenceFragment;
import android.support.v7.app.AppCompatActivity;
import android.os.Bundle;
import android.support.v7.widget.Toolbar;
import android.view.MenuItem;

public class SettingsActivity extends AppCompatActivity {


    @Override
    protected void onCreate(Bundle savedInstanceState) {
        super.onCreate(savedInstanceState);
        setContentView(R.layout.activity_settings);

       Toolbar toolbar = (Toolbar) findViewById(R.id.toolbar);
        setSupportActionBar(toolbar);
        getSupportActionBar().setDisplayHomeAsUpEnabled(true);
        getSupportActionBar().setDisplayShowHomeEnabled(true);

        FragmentManager fragmentManager= getFragmentManager();
        FragmentTransaction fragmentTransaction = fragmentManager.beginTransaction();

        SettingsFragment settingsActivity = new SettingsFragment();
        fragmentTransaction.add(R.id.content_frame,settingsActivity,"Settings");
        fragmentTransaction.commit();
    }

        public static class SettingsFragment extends PreferenceFragment{
            @Override
            public void onCreate(Bundle savedInstanceState) {
                super.onCreate(savedInstanceState);
                addPreferencesFromResource(R.xml.app_preferences);
            }
        }

    @Override
    public boolean onOptionsItemSelected(MenuItem item) {
        switch (item.getItemId()) {
            case android.R.id.home:
                onBackPressed();
                return true;
        }

        return super.onOptionsItemSelected(item);
    }

}
Edit activity_main.xml layout
In the activity_main.xml layout add the button to navigate to the settings activity so u can perform settings behaviour later.
<?xml version="1.0" encoding="utf-8"?>
<RelativeLayout
    xmlns:android="http://schemas.android.com/apk/res/android"
    xmlns:app="http://schemas.android.com/apk/res-auto"
    android:orientation="vertical"
    android:id="@+id/relativelayout"
    android:layout_width="match_parent"
    android:layout_height="match_parent">
    <android.support.v7.widget.Toolbar
        android:id="@+id/toolbar"
        android:layout_height="wrap_content"
        android:layout_width="match_parent"
        android:minHeight="?attr/actionBarSize"
        android:background="?attr/colorPrimary"
        app:theme="@style/AppTheme"
        app:popupTheme="@style/ThemeOverlay.AppCompat.Light"/>

    <Button
        android:layout_width="match_parent"
        android:layout_height="wrap_content"
        android:text="Try Now"
        android:id="@+id/btnSettings"
        android:layout_centerVertical="true"
        android:layout_alignParentLeft="true"
        android:layout_alignParentStart="true" />

    <TextView
        android:layout_width="wrap_content"
        android:layout_height="wrap_content"
        android:text="Settings Example"
        android:id="@+id/textView"
        android:layout_above="@+id/btnSettings"
        android:layout_centerHorizontal="true"
        android:layout_marginBottom="59dp" />
</RelativeLayout>
Edit MainActivity.java class
Change the mainactivity.java file and create a new method call loadpreference to retrieve the changes made in the settings activity. You can get saved preference from getDefaultSharedPreferences().
package com.questdot.settingsexample;

import android.content.Intent;
import android.content.SharedPreferences;
import android.graphics.Color;
import android.preference.PreferenceManager;
import android.support.v7.app.AppCompatActivity;
import android.os.Bundle;
import android.support.v7.widget.Toolbar;
import android.view.View;
import android.widget.Button;
import android.widget.LinearLayout;
import android.widget.RelativeLayout;

public class MainActivity extends AppCompatActivity implements View.OnClickListener{

    Button btnSettings;

    @Override
    protected void onCreate(Bundle savedInstanceState) {
        super.onCreate(savedInstanceState);
        setContentView(R.layout.activity_main);
        Toolbar toolbar = (Toolbar) findViewById(R.id.toolbar);
        setSupportActionBar(toolbar);

        btnSettings=(Button)findViewById(R.id.btnSettings);
    btnSettings.setOnClickListener(this);
        loadPreference();

    }


    public void loadPreference(){
        SharedPreferences sharedPreferences = PreferenceManager.getDefaultSharedPreferences(this);

        boolean isBackgroundDark = sharedPreferences.getBoolean("background",false);

        if(isBackgroundDark){


            RelativeLayout mainLayout = (RelativeLayout)findViewById(R.id.relativelayout);
            mainLayout.setBackgroundColor(Color.parseColor("#3c3f41"));

        }
        else{
            RelativeLayout mainLayout = (RelativeLayout)findViewById(R.id.relativelayout);
            mainLayout.setBackgroundColor(Color.parseColor("#ffffff"));
        }

        String notebookTitle = sharedPreferences.getString("title",null);

        setTitle(notebookTitle);


    }

    @Override
    public void onClick(View view) {
        switch(view.getId()){
            case R.id.btnSettings:
                Intent intent = new Intent(this,SettingsActivity.class);

                startActivity(intent);
                break;
        }
    }


    @Override
    protected void onResume() {
        super.onResume();
            loadPreference();
    }
}
Change styles.xml
Dont forget to change your styles to noactionbar, so it will no display 2 toolbar later.
<resources>

    <!-- Base application theme. -->
    <style name="AppTheme" parent="Theme.AppCompat.Light.NoActionBar">
        <!-- Customize your theme here. -->
        <item name="colorPrimary">@color/colorPrimary</item>
        <item name="colorPrimaryDark">@color/colorPrimaryDark</item>
        <item name="colorAccent">@color/colorAccent</item>
    </style>

</resources>
Run your project
Now, you can run your project and test the settings now.