Android Integrate Google Analytics Tutorial

Google Analytics allow you to analysis your mobile application or website in almost real time. The benefits of integrate Google Analytics in your mobile application is to understand the behavior of the user when using your application. It is very useful which can help you to improve user experience to the end user. Google Analytics allow you to track event, activity, fragment , exception and crash in the application. In this tutorial, I will teach you how android integrate google analytics in the mobile application so you can view the data.
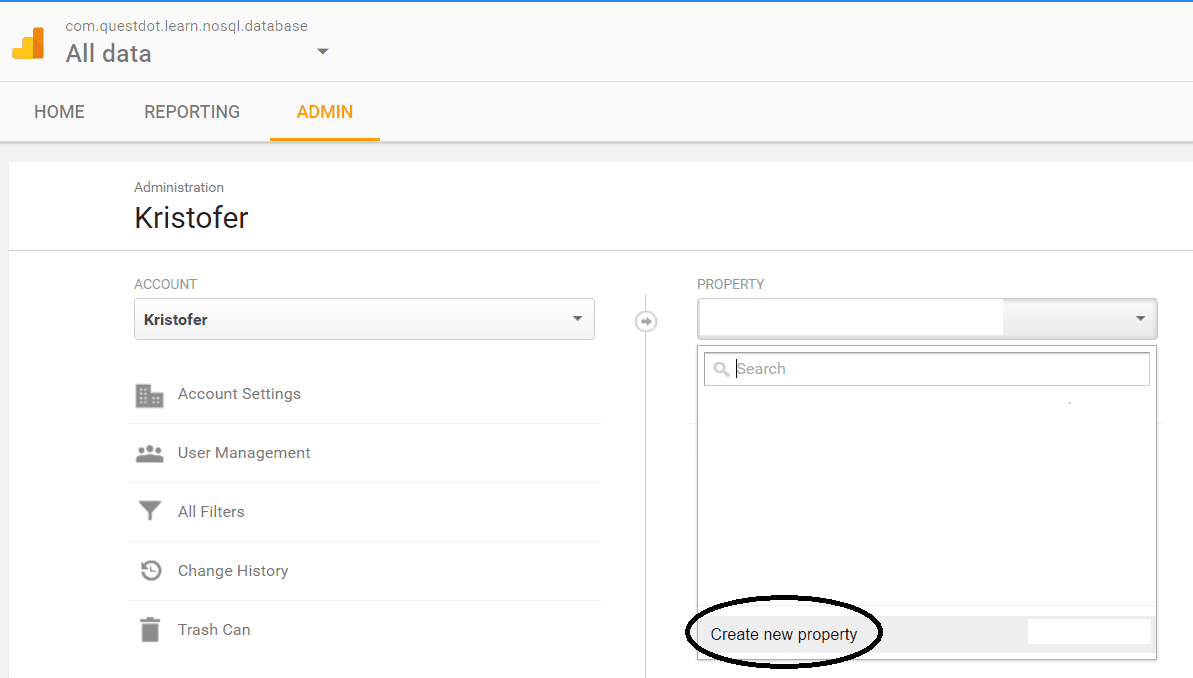
Create a new property
First, register a google analytics account
After that, you will be in the home tab, go select “Admin” tab, you will see the property section and click the drop down box , press create new property. For example you can see the picture below.
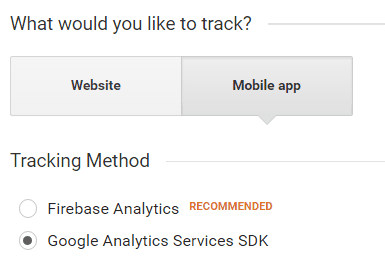
Fill in property form
Select mobile apps and Choose Google Analytics SDK as tracking method. And Fill in all the required fill then click “Get Tracking ID” button.
After that you will get the tracking ID, for example UA-77796837-7
Creating a New Project
1. Open Android Studio IDE in your computer.
2. Create a new project and Edit the Application name to “GoogleAnalyticsExample”.
(Optional) You can edit the company domain or select the suitable location for current project tutorial. Then click next button to proceed.
3. Select Minimum SDK (API 15:Android 4.0.3 (IceCreamSandwich). I choose the API 15 because many android devices currently are support more than API 15. Click Next button.
4. Choose “Empty Activity” and Click Next button
5. Lastly, press finish button.
Edit build.gradle
Go to your build.gradle (Module:app) and add
compile 'com.google.android.gms:play-services-analytics:9.2.0'
in the dependencies section, after that insert
apply plugin: 'com.google.gms.google-services'
in the last line outside the dependencies and sync your project now.
Create xml folder and create a xml tracker file
Right click the res > new > Android resource directory and change the resource type to xml then click “OK” button. After create the folder, then create a xml file “analytics_tracker” and copy the source code below. Note : the tracking id should be same as your tracking id in the google analytics.
<?xml version="1.0" encoding="utf-8"?>
<resources>
    <string name="ga_trackingId">UA-77796837-4</string>
    <bool name="ga_reportUncaughtExceptions">true</bool>
</resources>
Add extra permissions
In the androidManifest file add the internet and network permissions.
 <uses-permission android:name="android.permission.INTERNET"/>
    <uses-permission android:name="android.permission.ACCESS_NETWORK_STATE"/>
Set your first launch application file
Also in your androidManifest, add the name “BaseApplication” in the application section.
  <application
        android:allowBackup="true"
        android:name=".BaseApplication"
        android:icon="@mipmap/ic_launcher"
        android:label="@string/app_name"
        android:supportsRtl="true"
        android:theme="@style/AppTheme">
Add broadcastReceiver and service
Lastly, add Analytics broadcast receiver, Analytics services, Campaign Tracking receiver, Campaign Tracking services in your
 <receiver android:name="com.google.android.gms.analytics.AnalyticsReceiver"
            android:enabled="true">
            <intent-filter>
                <action android:name="com.google.android.gms.analytics.ANALYTICS_DISPATCH" />
            </intent-filter>
        </receiver>
        <service android:name="com.google.android.gms.analytics.AnalyticsService"
            android:enabled="true"
            android:exported="false"/>

        <!-- Optionally, register CampaignTrackingReceiver and CampaignTrackingService to enable
             installation campaign reporting -->
        <receiver android:name="com.google.android.gms.analytics.CampaignTrackingReceiver"
            android:exported="true">
            <intent-filter>
                <action android:name="com.android.vending.INSTALL_REFERRER" />
            </intent-filter>
        </receiver>
        <service android:name="com.google.android.gms.analytics.CampaignTrackingService" />
Create a custom application class
Create a new java file “BaseApplication” and extends application, copy the source code below and paste it in your file.
public class BaseApplication extends Application {

    private Tracker mTracker;
    private static BaseApplication instance =new BaseApplication();


    public BaseApplication() {
        instance = this;
    }

    public static BaseApplication getInstance() {

        return instance;
    }

    synchronized public Tracker getDefaultTracker() {
        if (mTracker == null) {
            GoogleAnalytics analytics = GoogleAnalytics.getInstance(this);
            // Setting mTracker to Analytics Tracker declared in our xml Folder
            mTracker = analytics.newTracker(R.xml.analytics_tracker);
        }
        return mTracker;
    }


    public void trackScreenView(String screenName) {
        Tracker t = getDefaultTracker();
        t.setScreenName(screenName);
        t.send(new HitBuilders.ScreenViewBuilder().build());

        GoogleAnalytics.getInstance(this).dispatchLocalHits();
    }


    public void trackException(Exception e) {
        if (e != null) {
            Tracker t = getDefaultTracker();

            t.send(new HitBuilders.ExceptionBuilder()
                    .setDescription(
                            new StandardExceptionParser(this, null)
                                    .getDescription(Thread.currentThread().getName(), e))
                    .setFatal(false)
                    .build()
            );
        }
    }


    public void trackEvent(String category, String action, String label) {
        Tracker t = getDefaultTracker();

        t.send(new HitBuilders.EventBuilder().setCategory(category).setAction(action).setLabel(label).build());
    }

}
Create a new Activity
Add a new activity “AnotherActivity” and set the analysis tracker.
public class AnotherActivity extends AppCompatActivity {


    @Override
    protected void onCreate(Bundle savedInstanceState) {
        super.onCreate(savedInstanceState);
        setContentView(R.layout.activity_another);


    }

    @Override
    protected void onResume() {
        super.onResume();

        BaseApplication.getInstance().trackScreenView("Another Screen lo");
    }

}
Create a new Fragment
Add a new fragment”Fragment” and set the analysis tracker.
public class Fragment extends android.support.v4.app.Fragment {


    @Nullable
    @Override
    public View onCreateView(LayoutInflater inflater, ViewGroup container, Bundle savedInstanceState) {
        return inflater.inflate(R.layout.my_fragment, container, false);
    }

    @Override
    public void onResume() {
        super.onResume();

        BaseApplication.getInstance().trackScreenView("Fragment");

    }

}
Edit acitvity_another.xml layout
Add a textview in this layout to identify the activity.
<?xml version="1.0" encoding="utf-8"?>
<RelativeLayout xmlns:android="http://schemas.android.com/apk/res/android"
    xmlns:tools="http://schemas.android.com/tools"
    android:layout_width="match_parent"
    android:layout_height="match_parent"
    android:paddingTop="@dimen/activity_horizontal_margin"
    tools:context=".MainActivity">


    <TextView
        android:text="Another Screen"
        android:layout_width="wrap_content"
        android:layout_height="wrap_content"
        android:layout_centerVertical="true"
        android:layout_centerHorizontal="true"
        android:id="@+id/textView" />
</RelativeLayout>
Edit my_fragment.xml layout
Add a textview and set the background color to identify the fragment is added in the activity.
<FrameLayout xmlns:android="http://schemas.android.com/apk/res/android"
    xmlns:tools="http://schemas.android.com/tools"
    android:layout_width="match_parent"
    android:layout_height="match_parent"
    >

    <TextView
        android:layout_width="match_parent"
        android:layout_height="wrap_content"
        android:text="Fragment"
        android:background="@color/colorAccent"
        android:textColor="#ffffff"
        android:textAlignment="center"
        android:gravity="center"
        android:textSize="15dp"
        android:layout_margin="20dp"/>

</FrameLayout>
Edit activity_main.xml layout
I will add 5 buttons which for tracking activity, fragment, event, exception and crash.
<?xml version="1.0" encoding="utf-8"?>
<RelativeLayout xmlns:android="http://schemas.android.com/apk/res/android"
    xmlns:tools="http://schemas.android.com/tools"
    android:layout_width="match_parent"
    android:layout_height="match_parent"

    android:paddingTop="@dimen/activity_horizontal_margin"
    tools:context=".MainActivity">

    <LinearLayout
        android:layout_alignParentTop="true"
        android:layout_width="match_parent"
        android:layout_height="wrap_content"
        android:orientation="vertical"
        android:layout_above="@+id/container"
        android:weightSum="5">

        <Button
            android:id="@+id/bNextScreen"
            android:layout_width="match_parent"
            android:layout_height="match_parent"
            android:layout_gravity="center_horizontal"
            android:layout_margin="20dp"
            android:layout_weight="1"

            android:text="Track Activity"
            />

        <Button
            android:id="@+id/bFragment"
            android:layout_width="match_parent"
            android:layout_height="match_parent"
            android:layout_gravity="center_horizontal"
            android:layout_margin="20dp"
            android:layout_weight="1"
            android:text="Track Fragment"
            />

        <Button
            android:id="@+id/bEvent"
            android:layout_width="match_parent"
            android:layout_height="match_parent"
            android:layout_gravity="center_horizontal"
            android:layout_margin="20dp"
            android:layout_weight="1"
            android:text="Track Event"
           />

        <Button
            android:id="@+id/bException"
            android:layout_width="match_parent"
            android:layout_height="match_parent"
            android:layout_gravity="center_horizontal"
            android:layout_margin="20dp"
            android:layout_weight="1"
            android:text="Track Exception"
           />

        <Button
            android:id="@+id/bCrashApp"
            android:layout_width="match_parent"
            android:layout_height="match_parent"
            android:layout_gravity="center_horizontal"
            android:layout_margin="20dp"
            android:layout_weight="1"
            android:text="Track Crash"
            />

    </LinearLayout>


    <FrameLayout
        android:padding="10dp"
        android:id="@+id/container"
        android:layout_width="match_parent"
        android:layout_height="wrap_content"
        android:layout_alignParentBottom="true" />

</RelativeLayout>
Edit MainActivity.java class
This class will perform all the tracking so it can be perform nicely.
public class MainActivity extends AppCompatActivity implements View.OnClickListener {


    @Override
    protected void onCreate(Bundle savedInstanceState) {

        super.onCreate(savedInstanceState);
        setContentView(R.layout.activity_main);

        Button bNextScreen = (Button) findViewById(R.id.bNextScreen);
        Button bFragment = (Button) findViewById(R.id.bFragment);
        Button bEvent = (Button) findViewById(R.id.bEvent);
        Button bException = (Button) findViewById(R.id.bException);
        Button bCrashApp = (Button) findViewById(R.id.bCrashApp);

        bNextScreen.setOnClickListener(this);
        bFragment.setOnClickListener(this);
        bEvent.setOnClickListener(this);
        bException.setOnClickListener(this);
        bCrashApp.setOnClickListener(this);
    }

    @Override
    protected void onResume() {
        super.onResume();

        BaseApplication.getInstance().trackScreenView("Main Screen Now");
    }

    @Override
    public void onClick(View view) {

        switch(view.getId()){
            case R.id.bNextScreen:
                Intent i = new Intent(MainActivity.this, AnotherActivity.class);
                startActivity(i);
                break;

            case R.id.bFragment:


                FragmentManager fragmentManager = getSupportFragmentManager();
                FragmentTransaction fragmentTransaction = fragmentManager.beginTransaction();
                android.support.v4.app.Fragment myFragment = (android.support.v4.app.Fragment) fragmentManager.findFragmentByTag("TAG_FRAGMENT");
                if (myFragment == null) {

                    myFragment = new Fragment();

                    fragmentTransaction.replace(R.id.container, myFragment, "TAG_FRAGMENT");
                    fragmentTransaction.commit();

                } else {
                    fragmentTransaction.remove(myFragment).commit();

                }
                break;

            case R.id.bEvent:

                BaseApplication.getInstance().trackEvent("Category","Action","Label");

                Toast.makeText(MainActivity.this, "Event is recorded", Toast.LENGTH_LONG).show();
                break;

            case R.id.bException:
                Exception e = null;

                try{
                    int num[]={1,2,3,4};
                    System.out.println(num[5]);
                }catch (Exception f){
                    e = f;
                }
                if( e != null){

                    Toast.makeText(MainActivity.this, "The Exception is: " + e, Toast.LENGTH_LONG).show();

                    BaseApplication.getInstance().trackException(e);
                }


                break;

            case R.id.bCrashApp:

                Toast.makeText(getApplicationContext(), "App Crash!", Toast.LENGTH_LONG).show();
                Runnable r = new Runnable() {
                    @Override
                    public void run() {
                        startCrash();

                    }
                    public void startCrash() {
                        throw null;
                    }

                };
                Handler h = new Handler();
                h.postDelayed(r, 1500);
                break;
        }

    }
}
Run your Project
Finally, you can run the android project and go to the google analytics and check out the realtime data.